
- Benefits of a Centralized Jenkins Pipeline for Multiple Repositories
- How to Set Up a Jenkins Multirepo Pipeline Using the Remote File Plugin
- Step 1: Add a Webhook to Your Bitbucket or GitHub Repositories
- Step 2: Create a Jenkins Job for Multiple Repositories
- Step 3: Use the Remote File Plugin to Share a Centralized Jenkinsfile
- Adding New Projects to Your Jenkins Multirepo Pipeline
- Conclusion
How to use a single Jenkins pipeline for multiple repositories with the Remote File Plugin
Managing continuous integration and delivery (CI/CD) pipelines across multiple repositories can be challenging, particularly when it requires maintaining a separate Jenkinsfile in each project. This article presents a streamlined solution for organizations seeking to implement a unified Jenkins pipeline for multiple repositories by leveraging the Remote File Plugin. By centralizing your pipeline configuration, you can ensure consistency, simplify maintenance, and enhance the scalability of your Jenkins-based DevOps processes.
Benefits of a Centralized Jenkins Pipeline for Multiple Repositories
Maintaining a Jenkinsfile in every repository can be tedious, especially if you have many similar projects. By centralizing your pipeline logic with a shared Jenkinsfile, you can:
- Ensure consistent CI/CD processes across all builds
- Update your Jenkins pipeline in one place
- Onboard new repositories quickly and efficiently
- Reduce maintenance overhead and risk of configuration drift
How to Set Up a Jenkins Multirepo Pipeline Using the Remote File Plugin
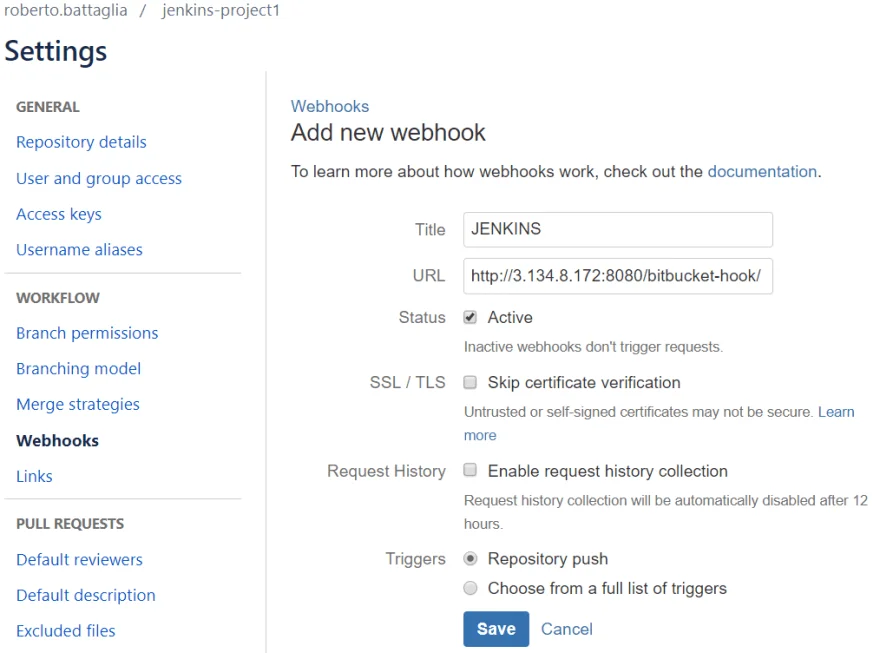
Step 1: Add a Webhook to Your Bitbucket or GitHub Repositories
To trigger Jenkins jobs automatically when you push to your repositories, add a webhook. For Bitbucket, the webhook URL is the address of your Jenkins server plus /bitbucket-hook/ (do not forget the trailing slash). For GitHub, use the appropriate webhook endpoint for your Jenkins setup.
Step 2: Create a Jenkins Job for Multiple Repositories
- In Jenkins, create a new item and select Bitbucket Team/Project (requires the Bitbucket Branch Source Plugin) or the equivalent for GitHub.
- Enter your Bitbucket or GitHub organization/owner and credentials under Projects. For Local File, enter
pom.xml(or another file common to your projects) so Jenkins can recognize which repositories to scan for pipeline execution. - Jenkins will now be able to automatically scan all your projects and trigger builds for each repository that matches the criteria.
Step 3: Use the Remote File Plugin to Share a Centralized Jenkinsfile
Instead of maintaining a Jenkinsfile in every repository, you can keep a single, shared Jenkinsfile in a dedicated repository. To configure this:
- Go to your Jenkins job configuration, under Projects, and click Add > Remote File Plugin (install the Remote File Plugin if you have not already).
- Enter the repository information for the repo containing your centralized Jenkinsfile, and specify the script name you want Jenkins to use for your multirepo pipeline.
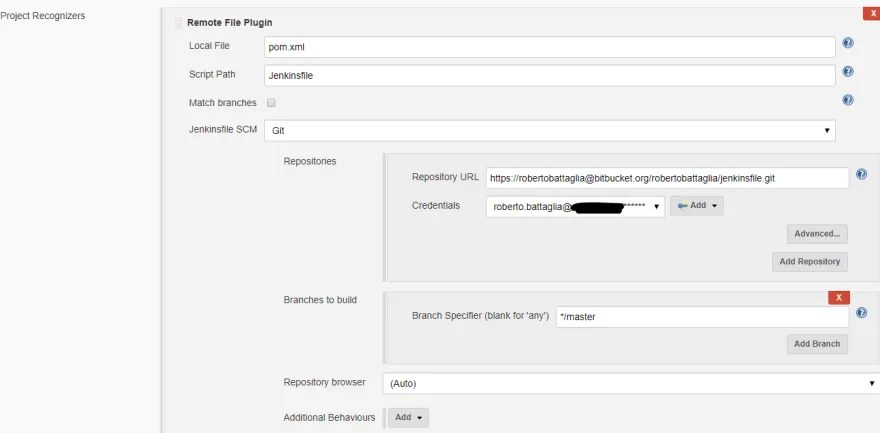
Now, every time you push to any of your repositories, Jenkins will use the shared Jenkinsfile from your central repository to run the pipeline, ensuring a consistent CI/CD workflow across all projects.
Adding New Projects to Your Jenkins Multirepo Pipeline
To add a new project to this setup, simply add it to your Bitbucket or GitHub organization and run Scan Organization Folder in Jenkins. The centralized pipeline will be triggered for the new repository as well. You can also automate the scan by setting a periodic scan trigger in the configuration page of your Bitbucket Team/Project or GitHub Organization Folder.
Conclusion
By using the Remote File Plugin, you can maintain a single Jenkins pipeline for multiple repositories, making your CI/CD and DevOps automation setup easier to manage and scale. This approach is ideal for teams with many similar projects who want to keep their build logic DRY, centralized, and consistent across their entire codebase.
- Benefits of a Centralized Jenkins Pipeline for Multiple Repositories
- How to Set Up a Jenkins Multirepo Pipeline Using the Remote File Plugin
- Step 1: Add a Webhook to Your Bitbucket or GitHub Repositories
- Step 2: Create a Jenkins Job for Multiple Repositories
- Step 3: Use the Remote File Plugin to Share a Centralized Jenkinsfile
- Adding New Projects to Your Jenkins Multirepo Pipeline
- Conclusion